
Water is a chemical compound with multiple properties. In chemical terms, water is referred to as H2O, implying that a water molecule contains two hydrogen atoms with one oxygen atom between the two. Water is indispensable for survival; both humans and animals cannot exist without water. Seventy percent of the human body is made up of water. Nonetheless, despite its significance, water can still wreak havoc if not filtered and purified.
Water that is not purified contains fluoride, chlorine, parasites, dioxins, and other substances that could be harmful to your health. This article will provide a guide on how to make a water filter for your survival in the wilderness. A lot of filtration systems utilize charcoal, carbon, or a blend of substances to help minimize impurities. These systems reduce contaminants in one of these two ways.
First, some impurities are filtered mechanically, implying that they are big enough to be ensnared in the holes of the filters. There are some that attach to the filter media surface.

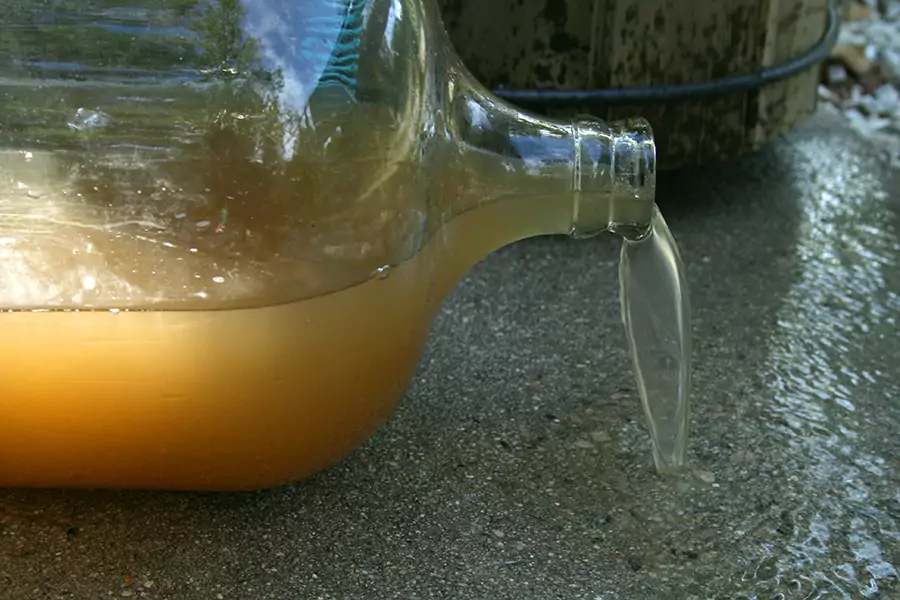
Image Credit: businessinsider.com.au
Eventually, the entire surface of the filter media is filled making it impossible for additional contaminants to be absorbed. Or in mechanical filtration, the holes of the filtering media become clogged with impurities such that it is impossible for water to pass through the media effectively.
While it is easy to spot the clogging of mechanical filters (since the rate of flow slows dramatically) it’s difficult to tell when the media is full and requires to be changed.
For that reason, you need to be keen on its operations so you can know when it’s time for you to change the filtering media.
Different Methods of Purification
There are three main methods of water treatment you can use for your emergency or survival needs. These are:
Distillation
This refers to a process of heating water to 100oC, trapping and cooling its water vapors, and collecting the condensed fluid. The contaminants will “accompany” the vapor and end up in a distillate. This is not a new technique as it has been used for centuries. It is imperative to note that modern distillation techniques vary.

If you want to treat your water using this method, you need to select a good or advanced equipment for a better result. However, you need to know that this technique is slow compared to other methods such as UV water treatment and reverse osmosis.
Reverse Osmosis
In reverse osmosis, the tap water flows through a semi-permeable surface which ranges from ninety to ninety-nine percent of substances originally present. Initially meant for industrial use, this practice is becoming popular in a domestic application.

In practice, water portions allow for the rejection of particles selected by the polyamide TFC membrane. Although powerful, it is sensitive to chlorine and must, therefore, be protected with carbon filters.
Under normal conditions, it has a lifespan of about five to eight years. This technique is relatively slow and needs a substantial pressure.
UV water purification
This technology is the most efficient and the most cost-effective on the market. It makes it possible for survivalists, homeowners, and business owners to get rid of biological contaminants in the water supply.

This technique of water treatment offers a myriad of advantages over other methods for microbiological contaminants. Additionally, the process leaves no chemicals, produces no by-products, and never changes the properties of the water.
If you have a source of untreated water (wells, lake waters, rainwater, etc.), this would be an ideal process for treating your water.
The primary objective of this technique is to get rid of harmful biological contaminants.
In any of the above techniques, it is important to change your filters on a regular basis. Activated carbon filters can be ineffective is they are poorly maintained.
Worse, they can reject the contaminants previously removed from the water.
Benefits of Water Filtration
There are so many options for drinking water – bottled, tap, alkaline, distilled, etc. For an everyday consumer, it can be quite confusing.

But do not worry – this guide is here to help you! Here are some reasons why filtered water is the right choice for consumption.
Common elements removed from filtered water:
- Aluminum: Water that is not filtered can result in increased aluminum consumption, an element which is linked to hyperactivity and Alzheimer’s disease
- Arsenic: Water can contain high levels of arsenic, a strong carcinogen which is associated with an increased risk of cancer
- Disinfection Byproducts: The DBPs are hazardous substances which result from the disinfection of water with chlorine. These elements are also known to be carcinogenic
- Fluoride: While this is a component that is commonly linked to improvement in oral health, fluoride can cause a myriad of health complications such as cellular damaging and weakening of the immune system
Do It Yourself Filtering Systems
Paper Towels, Cotton Fabric, and Coffee Filters
All these materials can be used to separate debris from the water. Always remember that it may require various phases to rid the water of debris and contaminants completely, and not all particles are captured in the process.
However, this is a basic technique for filtering water before boiling it. At the minimum, you might make the liquid less cloudy. A coffee filter can be placed upside over any container of your choice.

Image Credit: offgridweb.com
Using an O-ring or a rubber band, seal the filter to a container. Pour the water over the filter slowly and carefully. The same may be done with a fabric or paper towel.
Avoid using dyed or colored materials and use white fabric only. For safety reasons, you will need to boil the water once the filtration is over. To learn more on how boiling water kills harmful pathogens and bacteria, see our article dealing with this topic.
Coffee filter and Banana Peel
If there are banana peels within your disposal, you can grind them and put the cut up peels in your coffee filter.

Place the coffee filter on top of a container and put water into the vessel. The peels will accumulate bacteria and slightly flavor the water. It is still recommended to boil the water after it has been filtered.
The Tree Bark Filter
While some Do-it-yourself filters call for the utilization of the 2-liter plastic bottle for emergency situations, you may not have a bottle at your disposal.
Thankfully, if you carried a blade with you, you can remove the bark of different plants, all of which should have flexible exteriors which you can use to make your homemade water filter.

Examples of pliable tree bark options are cedar, basswood, pine, birch, and elm. In this case, you will need to get a piece that is big enough to allow you to make a cone shaped object when the edges are brought together.
Using a piece of string, or roots, or whatever object you can get, tie the cone to prevent it from opening. You will still need activated carbon for your filtration, but you may plug the inside with sand, grass, and gravel to quickly form a rudimentary filter.
Types of Water Filters
In situations of survival, it can be challenging to find drinking water, let alone water that is clean for consumption.
Thankfully, if you have an idea of how to make the water clean, you can convert a potentially toxic fluid into one you can consume safely for your survival.

Image Credit: tigroadtrip.com
There are numerous techniques for water filtration, all of which can be effective if done the right way.
The more techniques you know for water filtration using locally available materials, the better off you are for any survival or emergency situation.
Also, make sure you know how to find water even in the dessert by reading our popular article on this topic.
The Simple Sand Water Filter
The following steps are essential when it comes to making a simple sand water filter to help you survive while you are out hiking or camping.
- Step 1. To begin with, you will require a container. If you can get a large empty container, it would be a great equipment to use. Punch five to ten holes in the container’s bottom.
A huge plastic bottle can also be used. Cut off the bottle’s end in an even manner. If you do not have a container at your disposal, you can use any material nature can provide. If you happen to find a birch tree, create a cone from its bark. Your improvised cone needs to have a tiny hole in its bottom. Make sure the cone is well tied up to prevent it from opening up. - Step 2. You need to prevent sand from getting out of the container. Find some materials to put at the bottom. These may include:
- Cotton material
- A grass mesh (non-poisonous)
- Some pebbles
- Step 3. Add a gravel layer. The purpose of this layer is to add strength to the filter material and prevent the filtered water from mixing with sand
- Step 4. Fill the cone or bottle with sand
- Step 5. Collect the water. Pour the collected water through your filter. Tap the water in a different container at the bottom of the filter. The water coming out of the filter should be clear. If not, you will need to pass it through the filter once more and repeat the process until you get the results you desire.
- Step 6. Boil your filtered water, so you can get rid of bacteria and other microorganisms.
The Bio Filter
Similar to the bottle filter, the bio-filter has some layers of materials and components which the liquid is put through to allow for separation of water from its contaminants.
However, just like the bottle or cone filter, this method will not rid the water of every single pathogen.

Image Credit: coroflot.com
It can isolate a majority of the pathogens so you may drink your water, but the body may have the responsibility of fighting off other pathogens that did not get filtered out.
This is a risk you need to be aware of and you will need to follow this technique with a different treatment method such as boiling.
The ingredients for this type of filter include the following:
- Fiberglass screen
- Five-Gallon Food Grade Buckets – 4 for every filtration stage and 1 for storing the filtered water.
- Plastic cups
- Hole saw
- O-rings or rubber bands (Alternative: glue for a secure hold)
- Plastic fitting with tubing – This will be used to release water from bio, filter after it goes through three phases of filtration
- Plastic plumbing fittings – This will be utilized between the stages of filter and for control of the water flow
- Gravel for the first filtration stage – This will be used to separate big debris pieces such as tadpoles, insects, twigs, and leaves
- Sand for second filtration stage – This will be used to filter out smaller components which the gravel failed to capture. From here, water will flow to the third material layer
- Activated charcoal (activated carbon) – The charcoal will be used to get rid of bacteria and chemical, but not all. Air flows through the charcoal forcing the charcoal pores to open. These openings will absorb the chemical and some bacteria in a bonding process. The microporosity of charcoal, after it has been activated, is a surface area larger than five-hundred square meters.
Instructions:
- Step 1. Stretch the fiberglass over fittings which will be placed inside the plastic buckets. Use rubber bands or O-rings to seal and safeguard the screen. If you need a secure fit, you can use an adhesive.
- Step 2. In the middle of 2 of the gallon buckets, make a hole that is equal to your threaded fitting diameter. In the third bucket, cut another hole above the base on the bucket’s side.
- Step 3. Join the buckets with plumbing fittings to ensure that the side of the fitting is up at all times. Use the O-rings to make a seal between fittings.
- Step 4. Join the fitting to a third bucket, including the flexible plastic tubing on the side hole
- Step 5. Using two bucket lids, make a hole in each, slightly bigger than the fitting. The loose fitting will enable the buckets to be stackable
- Step 6. You can make the screen of fiberglass more durable with a few plastic cups. You may drill holes through the sides of the cups, placing a cup over every screened fitting and attach them into position
- Step 7. Hose out the whole system using the garden hose to get rid of debris and dust
- Step 8. Fill 3 buckets, one with sand, the other with charcoal, and the last with gravel until they are each 75 percent full. The order from the bottom to the stop should be charcoal, sand, and gravel respectively. Place a lid on the bucket containing gravel
- Step 9. The aeration process allows you to add air into bio-filter. This process is achieved by passing water through the bucket several times. This technique can also be accomplished using pitchers.
XYLEM Plant Filter
The good thing about making filter system is the ability to design any equipment using the locally available material. For instance, it is possible to make a filter using a few supplies and a tree branch.
A pine branch would be an ideal example since this plant contains sap which contains xylem. The xylem will filter the dirt and absorb some substances. Additionally, this substance will filter some bacteria.
This kind of filter is notably effective being rudimentary in nature. This technique has been found to be ninety-nine percent in getting rid of the bacteria in the water.
On the downside, it is not an excellent filter as it is unable to get rid of hepatitis or rotavirus, and this is why the process of filtration is followed with a boil. For this technique, you will require the following:
- A pine branch
- A 2-liter bottle
- A hose clamp
- A container for storing the filtered water
Using a knife, peel off the branch’s bark, and if you have a piece of sandpaper, use it to smoothen the sides of the xylem. Here’s our top list of the best camping knife that you’ll need for survival in the woods, check it out.
This filter can be utilized more than once, as long as you prevent the stick from drying out. Once you have peeled the branch, be certain it can fit into the bottle’s neck.
If the fit is tight, use a knife to carve some edges of the stick so it can fit into the bottle with ease. Cut the base of the bottle using a blade.
Place about 3 inches of pine branch in the bottleneck. At this point, you can turn the bottle upside down so you can reveal the open base you made. Slowly fill the bottle with water.
The water will be filtered as it flows through the stick and the sap will get rid of the dirt and bacteria in the water.
Final Words
While it is always significant to know how to make a water filter in case you find yourself needing clean water, knowing more than a single method of water filtration is instrumental for your outdoor survival. It is advisable to learn at least three techniques for filtering water in order to have a range of options to improvise.
For more on water filtration, see our informative piece on techniques to purify water in the wild without filters.
So, did you find this guide helpful? Have you ever had a situation where you had to improvise a water filter before? Let us know about your experiences in the comment section of this guide.


Thank you so much for this insightful article. I always carry my Lifestraw water filter with me but you never know when this knowledge will come in handy. I like that the DIY instructions are practical, easy to follow and use everyday materials that can be found almost anywhere. I will definitely retain this knowledge for future reference.
You’re welcome Jerry and glad my article is a keeper for you. Although many have their water filters with them, it’s still useful to have extra skills you can use when the situation warrants it. By the way, the LifeStraw is a stellar product – glad you have it!
This is such a great how-to article with practical DIY tips. I usually have a water filter but if my years of backpacking have taught me anything, it is that you never know when you will need to make something from scratch. It is comforting to know that should I be caught without clean water, I can always make a filter myself.
I’m glad the article helped you a lot. It’s also ok to practice making your own water filter prior to camping so you can have a ready grasp by the time you leave for camp. One of the things my parents taught me when we were still camping together is to hone my basic survival skills at home. So, you can imagine that there were a couple of projects my brothers and I persistently do to practice.