
Learning how to make different paracord knots is the first step before embarking on your paracord projects. Once you are familiar with the procedures of making these knots, you can then start to weave various interesting paracord designs for your paracord accessories like bracelets, key chains, pet collars and more.
Paracord is an excellent outdoor material that is cheap, resistant and multifunctional. Its applications are only limited by your imagination and weaving skills. Apart from using paracord to make the various paracord accessories mentioned above, you can also use it to pack more feet of cord which might be useful to you on your camping trips.
Most paracord weaves and knots are designed to unravel quickly. While it is a fact that the more expensive cords like the bungee cord are stronger and serve different purposes, they are way heavier to carry compared to the lightweight and versatile paracord.

Some of the most common knots and weaves will be discussed here and a brief step-by-step will be made available on how to make these knots and weaves. But before we get into the nitty-gritty of these knots, a brief look at some of the common mistakes that beginners make and which you should do your best to avoid.
Common Mistakes
Because you are just starting off in this endeavor, it is only natural that you make certain mistakes since you haven’t had a lot of practice. It is therefore helpful to be aware of the mistakes that you will most likely make and be prepared for them beforehand.

These are some of them.
- Too much melting: one of the common things to do in paracord knotting is using a lighter to melt the ends of the cord after completing a weave in order to kind of seal the ends. But a lot of people use too much heat and end up setting the whole paracord on fire. As you learn, you will become better at melting the ends but for your initial projects, make use of a butane lighter and be very careful.
- Improper measurements: a lot of beginners also have problems getting the right length of cord to be used. If you are not careful with measurements, you will end up having too much cord or too little cord and neither of this is ideal. It is perhaps more frustrating when you don’t have enough cord to finish up than it is when you have excels but with time, you will start to get the exact amount you need.
- Finishing up properly: a lot of people start the process properly and with the right knot but when they are done with the weaving, they get lazy and end up with the wrong type of knot. If you use a regular overhand knot to terminate your paracord works, it is not guaranteed to last long and it doesn’t look so great either.
- Stingy with the paracord: try not to be stingy with the amount of paracord you purchase. If you are very serious about learning all of the knots and patterns, you need to stock up on enough paracord.
After all it is cheaper to purchase the cord in bulk than it is to buy in pieces and with the right amount, there is less pressure as you have enough cord to practice with over and over again.
With these common mistakes at the back of your mind you can now proceed to start your learning process.
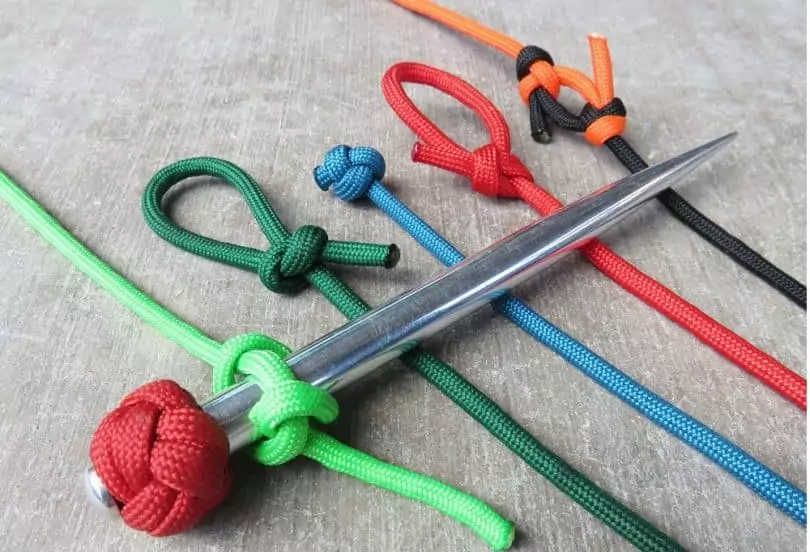
Cobra Knot
The cobra knot is sometimes called the Solomon bar or Portuguese sinnet. This is probably one of the most popular kinds of knot used in paracord bracelets and lanyards. It is also very easy to tie. You can find a useful video to follow here:
Procedures:
- Put the two open ends of your cord together and run your fingers through the length of the cord. This process divides the cord into two equal halves.
- Bend the left open side of the cord to the left and bend the right cord to the right with the middle run of the length still in place.
- Tae the left cord and drape it behind the main center part of the cord and take the right cord and bring it under the left cord that has now extended to the right and then bring it back over the center and into the loop on the left. Then pull and tighten. This is basically the cobra knot.
- You now take the cord on the right and o opposite side under and then take the left cord and go over the center and into the loop on the right. Continue alternating sides and repeating this procedure until you are almost all the way down and you eventually finish up with another knot at the bottom.
King Cobra Knot
This knot is actually very similar to the regular cobra knot with the same weaving but with the king cobra, you simply weave another cobra on an already weaved cobra.

So this is like a dual cobra knot. You can choose to use different colors to get a better looking result.
The Lanyard Knot
The lanyard knot is a tad more complex and it requires that you pay attention to more details. All of the extra work will pay off at the end as you will have a beautiful and sturdier design at the end. There’s a useful video to follow here:
Procedure:
- Bend your cord in half and loop the closed ends on your two middle fingers.
- Make a loop with the right cord and lay it over and across the left hand side loop. Make sure your loop is crossed on the left so that the open end at the other side of the loop is across your finger and not your palm.
- Take the other strand and go underneath the strand that extends from the loop. After going underneath, you are going to feed it through the loop by going over it and under the middle cord and then over the end of the loop.
- If you do this correctly you will end up with a figure 8 like structure with a diamond in the center.
- Now you take the strands on the left and the right and bring them around and through the diamond shaped opening at the center. Start with the left strand, bring it around in a counterclockwise manner and go underneath everything and back up through the diamond opening at the center.
- Do the same thing with the strand at the right, bring it over and underneath everything and back up the diamond shape at the center.
- Now you start to pull on the cord to tighten it. Don’t worry if it gets a little messy. After tightening, everything will fall into place. The resulting knot is a well-rounded and cinched up knot. Cut off excesses at the end and melt it with your lighter.
You can check out our tutorial on making a lanyard made of paracord to jumpstart your DIY paracord projects.
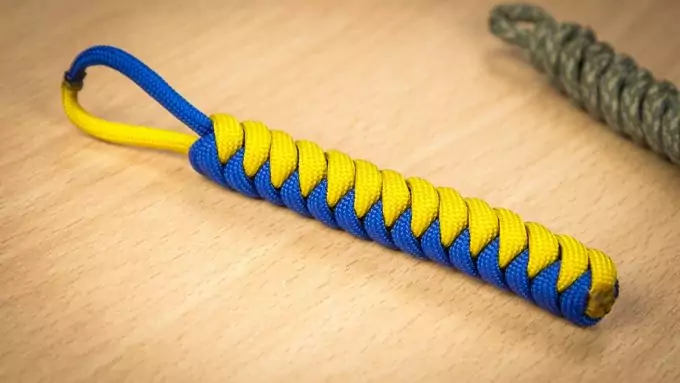
Snake knot
To do this knot, you need two strands of paracord of different colors. You will have to fuse them together and before we get into the actual knotting process, let’s first show you how to fuse two paracord strands together.
Some people just take two paracord strings and melt the two ends and put them together to fuse them directly and this works for the most part but the bond can easily break and foil all your hard work during your paracord project. Another great method that takes a little more time but is more effective will be shown to you now and it is guaranteed not to give you any problems.
First of all you need 2 pieces of paracord, scissors, a lighter, a needle and thread. Insert the thread into the needle and knot the loose ends shut. Then proceed to remove the inner threads of one of the paracord strings.
After this you then melt the ends of the other paracord string to form a dome like structure which you will proceed to insert into the open end of the other paracord string. After this you will use the needle and thread to stitch around the point where the two cords are now intersecting and there you have it, a much stronger fuse. Now you can proceed to making the snake knot. If you’re having trouble following the procedure mentioned below, you can use this video to help you along:
Procedure:
- Follow the procedure of fusing elaborated above and fuse two cords together
- At the point of fusion, make a small loop and take your left strand and make a loop around the right side by passing it over the right cord and behind.
- Now take the right cord and take it behind and over and put it through the loop on the right hand side and pull it through. Pull the cords at both ends and leave a little loop at the top end.
- Then you can start weaving down from the knot and continue down. Loosen slightly one side of the knot to create a second loop.
- Take the cord that went inside the new loop and bring it behind the other cord and back over and feed into the loop. Pull it tight.
- Turn it to the other side and do the exact same thing. Loosen one of the loops, take the cord that goes into the loop back, over and inside the new loop. Tighten up and do this until you get to the end.
Check out our article on how to craft a bracelet made of paracords to help you apply the techniques you’ve learned here.
Paracord Trilobite Knot
This knot lays the foundation for a kind of three sectioned weave. The easy-to-follow video can be found here:
Procedure:
- Get two strings of cord with different colors and find their middle points.
- Hang them both at their middle points on a clip or a nail on a wall.
- Pull two same colors to one side and the two other color to the other side and start knotting a few inches down.
- Take the outermost cord on the right and pass it over the two cords at the middle.
- Hold it in place and take the outermost cord on the left and pass it beneath the two at the center and over the loop at the right.
- Pull that same cord behind the same loop and over. Do the same with the cord at the left then pull that left cord again beneath the two at the center and out through the loop on the right.
- Pass the cord at the right over the two at the center and in through the loop on the left.
- Again pass the cord on the right under and out through the right loop and the left cord over and in through the left loop.
- Pass the left cord again beneath the two at the center and out through the loop on the left and right cord over the two at the center and in again through the loop on the left.
- You will continue this process again and again until you have the weave at the desired length.
The knots described above are just a handful compared to the very many different kinds available. You can easily do more research into other kinds of knots but these are the most useful and most common. It is always fun learning to tie these knots and you can do it with friends as a fun activity. Read our article on how to make paracord lanyards in order to use the knots you’ve learned here.

Also the items which you can make with these skills are very useful. For a beginner you should start off with the simple cobra knot and then make your way up into more complex and advanced designs. It might take some getting used to but once you get the hang of it, it will become second nature to you.
To learn more on how to make use of the paracord for survival in the wilds, see our article on the topic.
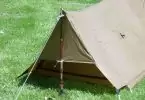


I use paracords often for field applications, like tying down valuable equipment, or for building a temporary shelter using sticks or by tying up the corners of a poncho or tarp.Although a nylon cord can also be used, paracords are at least 3 times stronger than the nylon cord. Each paracord also has 7 internal yarns and each of those internal yarns is also made of two individual strands. This gives you more applications out there in the field than a nylon cord would.
Aside from making bracelets, you never know when you would make good use of your paracord weaving skills. In case of emergencies you can use paracords to tie two straight sticks around a broken limb to make a splint. You can also make a stretcher by running paracord between two long sticks, or branches to move an injured person to safety.
I want to learn how to do these knots. I want to make a watch band out of paracord so I can give it as a gift for my boyfriend. He is into outdoor stuff and I think he would appreciate something I made and not just bought. This is much cooler compared to the DIY gift ideas I saw on pinterest.
I have been wanting to create something cool and useful which I can also share with my family. This page got me interested in learning these knots so I can make some small drawstring paracord pouches for my wet clothes or laundry, paracord keychains for my family, or a paracord cover for my water bottle.
That’s true. And the great part is that the material is cheap, versatile, functional and resistant. I can never go out hiking without the paracord and there’s hundred of uses for it. You’re only limited by your imagination and creativity, isn’t that neat?
Hi Julia and I’m very pleased that this article has provided some ideas for your DIY paracord projects. Whether outdoors or indoors, the paracord is very useful, providing hundreds of uses. It even neatly binds my electrical cords so it doesn’t look like a mess, would you believe that?
You can do a lot of things with the paracord. As I said before, you’re only limited by your imagination! It’s also a good thing that many videos show a lot of DIY for you to create your own paracord bracelets, lanyards and a lot more. Learn to tie those knots well so your creations will be more durable.
True! The paracord is very useful and versatile. There are hundreds of uses for these cords. Be sure to learn how these can help you travel and camp safely. I always keep my paracords close by so when an emergency strikes, I have them all with me.