
When you are going out for a long, multi-day trek or hike, and you will be out camping in the woods, it’s crucial that you carefully plan out not only what you are going to pack but how you pack it.
There is a methodology for properly packing a large hiking or backpacking backpack. Following it will not only make your load easier and safer to carry, but will also help you better organize your time out on the trail.
Therefore, in this article, we go over how to pack a backpack. Below, you’ll find a detailed step-by-step guide explaining the whole process.
Steps Involved in Packing A Backpack
Before going over the individual steps, it’s helpful to understand the two main types of packs, as this will help explain how to most effectively utilize the space you have inside it. There are two primary kinds of hiking backpacks are, namely, external frame and internal frame. These are briefly explained below:
- External frame packs: in an external frame pack, the frame is, as the name suggests, exposed. These types of backpacks are bulkier, more clunky, and generally considered more “old fashioned” compared to internal frame packs. To provide you a list of the outstanding external frame backpacks, see our must-read article on this topic.
- Internal frame packs: these are today much more common than external frame packs, particularly for backpacking. The support structure in an internal frame pack is inside the backpack, which is overall more conformed to the body and provides higher stability. In addition, most of the weight is transferred to the hips, which is ergonomically better.
Because internal frame packs are more common, and better overall for trekking and backpacking, we provide instructions tailored to this type of backpack. Here’s our list of the best internal frame backpacks to keep your back in tip-top shape.
Now, we can move on to the actual steps explaining how to pack a backpacking backpack.
Step 1: Organize the gear you are going to bring and prepare your pack
It might be helpful to write out a packing checklist or use a premade one. You can also make your life easier by grouping together small items (cooking supplies, toiletries) into plastic bags.

When you’re backpacking, space is extremely limited, and even the tiniest addition to your load needs to make sense. Because you are carrying your entire load on your back, you definitely don’t want any additional weight.
Cut out anything that is non-essential, and think about how you can “stack” items (for example, if you are bringing a bear canister, fill it with food!). It’s almost always better to go as lightweight as possible. But, on the other hand, you also want to pack everything you might need out on the trail, so make sure you aren’t forgetting anything!
This is also a good time to visually inspect your bag to make sure that it’s in good condition and there aren’t any rips or tears, especially if it’s been a while since you’ve used it.
Step 2: Make sure everything fits – both space and weight-wise!
Next, it’s a good idea to do a quick check space-wise. You can quickly dump everything into your backpack, just to see if it will all fit, before repacking more strategically. Also make sure that your fully-packed bag is not too heavy for you. This is particularly important if you are relatively new to backpacking, or if you are setting off on a multi-day hike.
Step 3: Make a plan
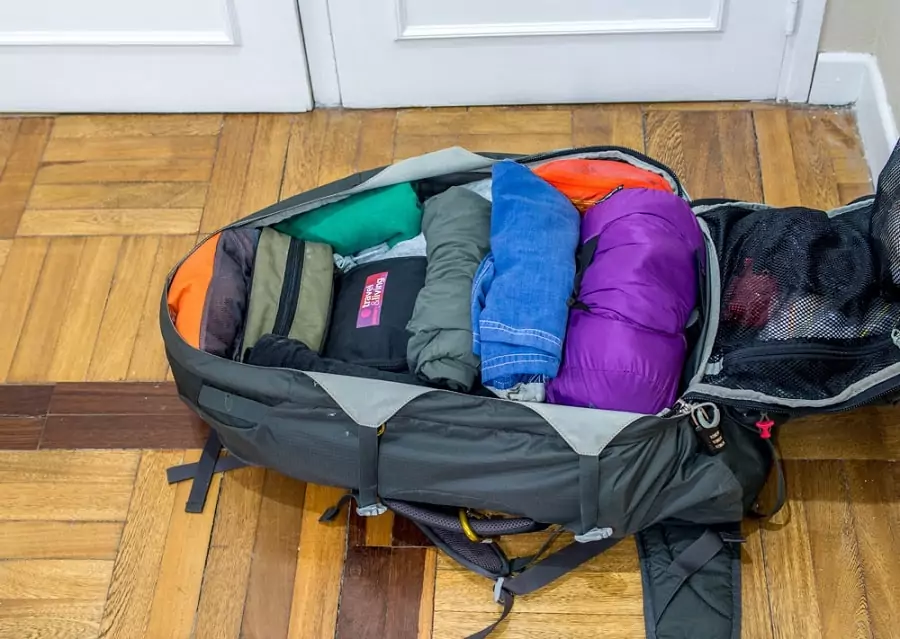
Once you have everything you need, and you’ve made sure it will all fit into your pack, you will need to strategically plan how you will fit everything into your pack. This is the most important part of properly packing a bag. It helps to visualize your load in terms of “layers” or “zones.” You can even group items according to which layer they belong in, before adding them to your bag.
At the bottom of the backpack, you’ll want to place all the larger items that you will need for making camp, but not before. This should include items you’ll need to sleep, such as your sleeping bag, camp shoes/clothes, and your sleeping pad, if you are bringing one.
The second, or middle, layer should be where you place your heaviest items. This will help with stability. The items you pack here should also be ones that you don’t need for your actual hike, such as cooking implements, heavier food provisions, bear canister (which you can fill with provisions), and your water reservoir. Make sure the densest items are the closest to your back.
The top layer is where you should store any items that you might need on your hike (but that wouldn’t fit in outer pockets). Strategically anticipating the items you will possibly need to access before you make camp, such as a rain jacket, toilet supplies, or first-aid kit, will prevent you from having to unpack your entire bag while still out on the trail.
Finally, most packs have multiple external pockets that you can access without having to open the actual backpack. These are very handy and should be fully utilized.
You’ll want to use these for small items that will invariably be used during your hike, such as snacks, maps, sunscreen, water bottle, GPS, and any important personal items such as your phone, wallet, and keys. An accessory pocket is also a great place to store a rain cover for your backpack.
Step 4: Do the actual packing
This is pretty straightforward. Follow the guidelines above, packing the grouped items by layers.
It’s generally advisable to minimize the number of things that you attach directly to the outside of your pack, as this can be cumbersome or even unsafe, but it makes more sense for certain items, such as poles and ropes. Carabiners and other fasteners can also be used to attach additional items to the outside of your backpack.
Note that if you are carrying a water reservoir (many backpacks have either built-in reservoirs, or spaces specifically designed to hold water receptacles) that you plan on accessing during your hike, it’s a good idea to fill it first, before adding the other items to your bag.
It’s also smart to wrap anything that could potentially spill in extra (and ideally leak-proof!) plastic bags. Conversely, if there is something you don’t want to get wet (such as matches or your electronic devices), you can also wrap these in waterproof bags, which are very light and don’t add any additional weight.
Finally, another tip is to use soft, shapeless items, such as clothes or your tent, to fill in spaces between the layers and heavier items in your backpack. This will help distribute the weight and ensure that items don’t shift around (think of it like the packing material in a shipping box!)
Step 5: Check the fit of the packed backpack and make adjustments if necessary
Try your backpack on and make sure that it feels right. Your backpack should distribute the weight evenly, with the heaviest part of the bag close to the center of the bag (and your back). It’s important that you make the adjustments necessary, to avoid back pain. Many backpacks have adjustable hip belts, load lifter straps, and sternum straps.
The backpack’s hip belt should comfortably sit on top of your hips (your hips should be bearing most of the load). Your shoulder straps should feel smug, but they shouldn’t be overly tight or taught, as they aren’t supposed to be bearing the bulk of your pack’s weight.

Luckily, most modern packs can be easily tweaked for the optimal fit. If you’ve tried your (packed) backpack and everything feels good, you’re all set to go!
See our ultralight backpacking tips to make your trip enjoyable and hassle-free – so check out the link to this crucial topic.
Conclusion
In this post, we went over how to pack a hiking backpack. The most important thing to remember is that when it comes to backpacking and trekking, a little planning goes a long way.
Packing your bag in strategic layers will not only help with stability and comfort, but will also ensure that you are able to access the items you need when you need them. Having a properly packed bag will make your hiking trip more organized – and enjoyable!
See our reviews of the finest backpack brands to make your outdoor adventures more meaningful – check it out.
Think we missed anything in this article? If so, let us know by leaving us a comment!


I personally believe that step one in packing a backpack is getting one big enough and with as many pockets as possible. I like being able to retrieve certain items without rummaging through the whole backpack. But, I am of sturdy build and can carry a relatively heavy pack with no trouble so I get to pack much more than most people.
We moved around a lot when we were kids due to my dad’s job so I learned to pack pretty early. But when it comes to backpacking, I always try to compact my gear as much as possible, starting with items like the sleeping bag which I know I will not need to retrieve while still on the trail.
Hi Sam and thanks for your comments. I’d say that even if your backpack can carry a lot of load – don’t overpack so you won’t feel so tired after your walk.
Hi Sam and thanks for your comments. I’d say that even if your backpack can carry a lot of load – don’t overpack so you won’t feel so tired after your walk.
The best advice my father gave me when I was starting to be a regular camper is “don’t overpack”. Even if your backpack says it can handle so much weight, don’t fill your bag to over capacity. I often walk a great distance to my secret camping site and I don’t relish carrying a backpack that weighs over a ton! My shoulders are not that forgiving anymore!