
When you are in a survival situation, we can all agree a knife in hand is much better than none. But there is still another thing we all need to agree on – a dull knife (even when it is the best knife in existence) will not be of any help since it wouldn’t hack, chop, slice, or cut. If you happen to find yourself in a survival situation, you will need to rely on a knife. And though you are better off with a blunt knife than no tool at all, utilizing a dull knife will be very frustrating.
If you are fortunate, you might have found it useful to bring a sharpening device with you before finding yourself stuck in the wilderness. In such a case, it will not be of much help if you do not know how to sharpen a knife with a stone. The process of honing your survival knife, pocket knife, or hunting knife’s edge is a relatively easy process. Even so, there is so much that actually goes into honing your knife. For instance, different kinds of steel and grinds require different grits and honing angles.
You will also need to know what kind of sharpener is suitable for your knife. The filed or Bushcraft knives will likely require a pocket sharpener as you will have these tools in the field. To find out the the top knife sharpeners available today, read our article on this for more options.

Having the right kind of whetstone is essential when you are out hiking or camping. Getting the best whetstone can be difficult, and this is why it’s important to know the features and tools to look out for.
If you find it hard to differentiate between a Saber and a Flat Grind, an oil stone and a water stone, an Arkansas stone and an India Stone, then keep reading and everything will be explained in detail.
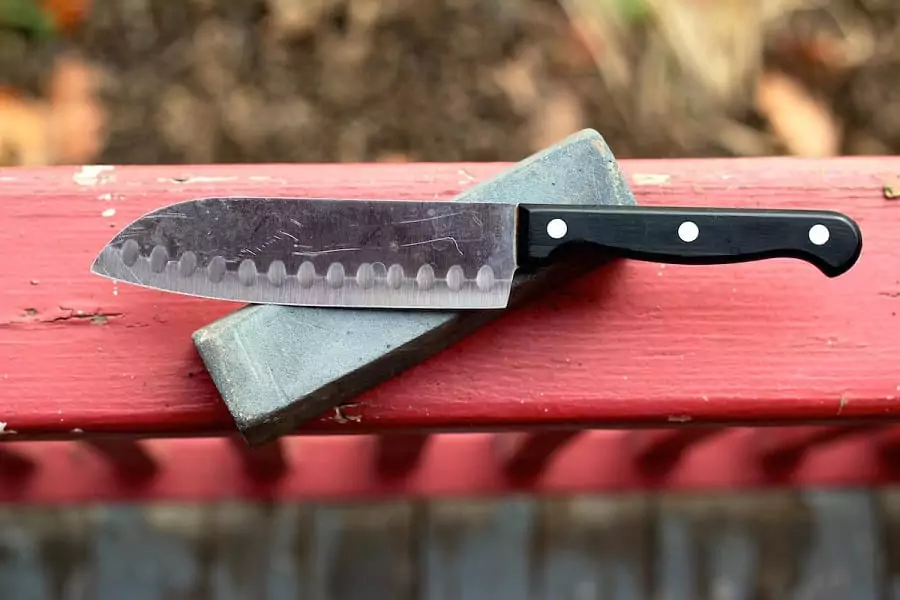
Whetstone Basics
The whetstones are divided into various groups made up of stones which are naturally-occurring and manmade. These include stones such as the Arkansas Oil, Water Stones, and the Japanese Stone. There are also manmade stones such as the silicon carbide (Indian Stones) and the aluminum oxide (Crystalon).
Both the manmade and natural whetstones are classified as either oil or water stones, implying that they can be used with either oil or water as their lubricant.

Additionally, there are other kinds of manmade whetstones like the ceramic and the diamond ones which can be used with or without lubrication. Both the manmade and natural whetstones can be found with different grits. The finer grit is less abrasive while the coarser one is more abrasive.
The main reason as to why you need to know and understand these aspects is that different knives with different kinds of blade grinds need sharpening at varying angles so as to achieve the right type of edge.
In addition to that, there are other essential terminologies about survival knife that you would find helpful. For that reason, we can begin by defining a number of terminologies.
Blade Grind 101
- Spine: The spine is the widest cross-section of a knife blade
- Hollow ground: This is a common grind which involves the removal of a convex hollow from both ends of the blade. A hollow ground creates a sharp edge but being very thin, its edge is vulnerable to damage compared to other grinds.
This kind of grind is not suited for heavy cuttings or chopping of hard materials. It is utilized extensively in knives that are mass-produced. - Flat grind: With this grind, the blade tapers all the way from its pin to the edge on both sides of the blade. A lot of material is removed when creating this grind, making it difficult to grind.
Thus, these kinds of grind limit their commercial use as they sacrifice the durability of edges for sharpness. - Saber ground: This is similar to the flat ground except that its bevel begins at the center of the blade and not the spine. The saber ground produces a lasting edge that offsets some cutting ability.
- Chisel ground: This kind of ground is similar to that of a chisel where one side is ground while the other is flat to the spine.
These kinds of knives tend to be sharper compared to the typical double beveled culinary knife. Knives that are chisel ground can be found in right or left handed varieties, depending on the side that is ground. - Convex ground: Instead of narrowing in a straight line to the edge, its taper is curved, although in a manner opposite to the hollow ground. This kind of shape keeps so much metal behind the blade making for sturdier edge and allowing for a good amount of sharpness.
Since it is used in axes, this one can also be referred to as an axe grind. As the taper angle is constantly changing, this grind requires some skill to reproduce on the flat stone. Compared to other blades, the convex types are made from thicker stock.
It is possible for you to combine grinds or create different variations.
For instance, some blades are flat ground for most of the blade but convex towards the edge.
Blade Steel Grinding Tips
Different Rockwell’s Hardness and different blades will require different grits and different Whetstone materials when sharpening them.
For instance, knives that have soft blades such as the SK-5 and 1095 ranging from fifty to fifty-five RHC are used for heavy, large, knives with Saber Grinds. Although they sharpen quickly, they undergo the greatest damage on their edges and therefore require the highest degree of repair.

For that reason, when sharpening a blade with a Saber Grinds manufactured from sober blade steel, begin with the coarse grit and then progress using a finer grit. But remember to leave the edge rough as it will easily dull the next time it’s used.
For knives with hard blades such as the ATS-34, 154-CM, or D2 about 58-63 HRC with Hollow or Flat Grinds, begin with medium grit and continue to a fine grit. To find out what’s the best survival knife to stay safe outdoors, see our article discussing this topic.
If the knife has a Hollow Grind with thin Primary Bevel, then you may want to polish its cutting edge with an additional fine grit.
Different Kinds of Whetstones
For those who are unfamiliar with these kinds of whetstones, the Japanese Water Stones are excavated in the Japanese mountains.
These stones are made from the ancient metamorphic stone deposits which are made of minute silicate particles suspended in a matrix of clay. As a result, the fine particles these stones tend to produce when sharpening a knife remove the steel easily while polishing the surface of the blade.
On the other hand, the Arkansas Oilstones are found in Arkansas Mountains. These substances come from the ancient deposits of the Novaculite that is believed to be a stone.

Novaculite produces fine particles when used for sharpening a knife and has the property of removing and polishing steel as well.
Then, there are manmade stones which are made from silicon carbide impregnated ceramic and powdered, industrial grade diamonds which do not need any kind of lubrication. However, despite the type of whetstone you decide to pick, the technique of sharpening a blade is pretty much the same.
Depending on the kind of whetstone you will be using, you may need to use some water or honing oil as a lubricant.
Then you begin by holding the knife by its handle and putting the edge against the stone at a ten to a thirty-degree angle depending on the Primary Bevel thickness, and then move the cutting edge’s length across the stone while maintaining the angle. After that, turn the blade onto its opposite side and repeat the process.
You should continue performing this action, changing sides until the desired sharpness is attained.
Nonetheless, if you are the type of person who finds it difficult to maintain a consistent angle when honing, there are different kinds of honing aids available on the market to help you make a fine edge on any knife blade.
Sharpening A Knife During A Survival Situation
Create your whetstone
Look for small coarse stones which you will find in rivers. Use a big stone to crush them into pulp. Once they are like mush, get a living wood that is as large as baseball bat handle and strip off the bark. Make the wood wet and rub the pulp around it.

The “contraption” can now act as your do-it-yourself whetstone. Draw the edge of the knife across the piece of wood until you attain your desired sharpness. For you to get the most out of the makeshift whetstone, hold the knife perpendicular to the piece of wood the whole time you are sharpening it.
Use a flat rock
If utilized the right way, a smooth, flat, smooth stone, probably a sandstone or any sedimentary rock, will easily hone your survival blade. The quality of your knife’s sharpness may not meet the levels of a blade sharpened by an actual sharpening tool, but since you are in a dire situation, it is more than enough for your needs.
These stones can easily be found in lakes, rivers, streams, ponds, and under waterfalls. The sedimentary rocks are much preferred over any other kind of stones you will find since the small abrasive particles that make up these stones enable a fast cutting process. To sharpen your blade, slide the rock along the sides of the knife until you attain the sharpness you desire.
To be able to cope up with any survival situation, why not check out our piece on how to be prepared to survive in the wilds.
Using your belt
Stropping is a method used in sharpening the edge of a blade by refining it and smoothening out the tiny burrs found on their edge.

To utilize this technique, you will need a piece of rubber or leather belt. Drag the edge of the blade back and forth on a strop while holding it at a small angle. Be keen to draw the knife away from its cutting edge, so it will not slice or cut the strop while performing this process. If you do not have a leather belt, you can also utilize a boot’s rubber sole as an alternative.
A Step by Step Guide
- Step 1: When working with a water stone, it is important to submerge the stone in water for about forty-five minutes before you can use it.
If the porous stone is not entirely saturated, it will dry out when sharpening it, making the blade of the knife catch, giving the edge nicks and dings. Make sure you soak the stone and the stone fixer. - Step 2: Put the stone on a towel that is set over a cutting board. It is imperative to keep a vessel of water nearby so you can regularly moisten the stone when sharpening the blade. The stone should be turned with its short side parallel to the counter’s edge.
- Step 3: Place your knife’s heel on the end of the stone, holding the knife firmly but gently using both hands at a fifteen to a twenty-degree angle. Applying an even pressure, drag the knife slowly over the stone. This should be done with the blade moving towards you, down the stone’s length while moving the knife simultaneously such that the point of contact moves towards the blade’s tip.
- Step 4: Be confident to maintain the fifteen to twenty angle as you drag the blade across the stone. Apply a firm but gentle pressure. The blade should slide smoothly across the stone as you drag or pull it.
- Step 5: Every stroke should end with the knife’s tip touching the stone’s bottom. Lift the blade, reset heel at the stone’s tip, and repeat the process.
- Step 6: As the process is repeated, a thin film of liquid should collect on the blade and on top of the stone. The abrasive liquid is important as it gradually takes off material from the knife’s edge, making it sharp.
- Step 7: As you keep repeating the strokes, in the end, a tiny burr will be formed on one side of the knife. To check for this burr, place the knife on your thumb and rub it backward.
If the burr is formed, it should stick slightly on your finger (with fine grit stones, approximately 2000 or above, you will not be able to feel this). This could take about thirty to forty strokes, and it’s an indication that you need to turn the blade to the other side for sharpening. - Step 8: To hone the second side, place the blade’s heel near the base of your stone, maintaining the fifteen to a twenty-degree angle as was the case with step three. Push the blade away gently from you while simultaneously dragging it across the stone to its tip.
- Step 9: Still maintaining the angles mentioned above, the stroke should end with the blade’s tip against the rock’s top edge. Do not forget to moisten the stone between various strokes to prevent it from drying out. Repeat the strokes as many times as possible until you can develop the burr.
- Step 10: After continued use, the stone will start to develop some groove in it, which could affect its sharpening power. A low-grit fixer can be used to fix this problem.
Place the stone fixer flat against the stone. Push the fixer to and from, back and forth so as to grind the stone down and create a flat surface. - Step 11: There should be a dedicated towel you can use for this purpose since the stone’s grit will never come out. Once the stone has dried out, you can store the stone wrapped directly using the towels.
- Step 12: Once you are done with sharpening, hone the blade on a steel so as to its edge in alignment, and test the knife for sharpness. Some recommend the slicing of a paper in half to ascertain whether or not the blade is sharp.
However, one may argue that even a relatively dull blade can pass the paper test, yet fail at other tasks.
The right test would be to simply use your sharpened knife to prep some vegetable. Is there any resistance? Does the blade fly through the onion? Can you chop a tomato thin enough to see through it? If yes, then your knife is good to go!
Wrap Up
As you can see, sharpening a knife is a process that begins with finding the right type of whetstone with the right grit, based on the kind of steel that was used to make the blade and its Rockwell Hardness.

Nonetheless, despite the type of stone you decide to select, the key to achieving an excellent cutting edge is to ensure a constant edge bevel angle is maintained throughout the whole sharpening process. That way, you will be able to get the result you will need to survive while you are outdoor camping or hiking.
To learn additional information on how to sharpen a pocket knife, see our article on this topic.
So did you find this article helpful? Is there anything else you feel should be included in the information provided? Please let us know by posting in our comment section. Also, do not forget to share!


This is such an insightful article, thank you. I really thought I knew how to sharpen my knives until I read this. Now I know what I have been doing wrong and will definitely do a better job preparing my knives next time. I have learnt a lot about knives from this article, and not just about sharpening but knives in general.
Thanks Marion! Sharpening knives is easy if you know what to do. I’m more at ease sharpening my blades with a stone and the step by step method I’ve outlined above works. It is easy to follow, too. Knives are becoming more expensive and taking care of them is needed.
Thank you for sharing this insightful article. There is nothing more frustrating than a blunt knife. Many people, including me, think that they know how to sharpen knives but they do not do it right. At least now I know the best way to sharpen my knives.
I think a lot of people do not know that sharpening knives are not only necessary but very easy to do. I find that using a whetstone is very convenient and uncomplicated. I’ve been watching my Dad sharpen our knives when I was in my teens and it fascinated me a lot. Besides, your blades will thank you for it!