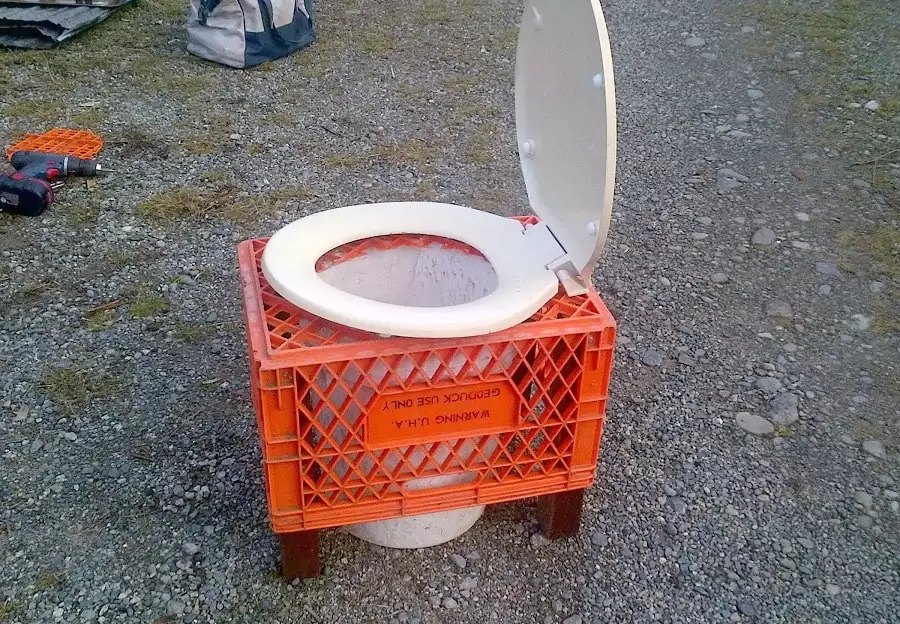
Camping is a relaxing and a great way to get away… until you have to go to the bathroom. This is the reason a lot of people, especially women, don’t enjoy going camping. Taking care of business in the outdoors can be a real challenge – but it doesn’t have to be! Wouldn’t you enjoy camping again if you had a comfortable and easy to use camping toilet? Then we have good news for you: You can make your own DIY camping toilet to eliminate all of your outdoor bathroom problems.
Portable camping toilets are environmentally friendly to prevent any pollution in the outdoor environments we all love to spend our free time in.

Follow our simple step-by-step directions to build your own camping toilet to take with you on all of your future outdoor trips and adventures. You’ll never have to worry about going to the bathroom outside again when nature calls.
How to Build Your DIY Camping Toilet
Items you will need:
- Bucket of 5gallons, with a snap on lid
- Plywood piece (make sure it has enough surface going over a toilet seat)
- Regular, hardware store toilet seat
- Small saw, like a scroll saw
- Glue, fasteners (nails, staples, or screws), caulk, and paint
Directions:
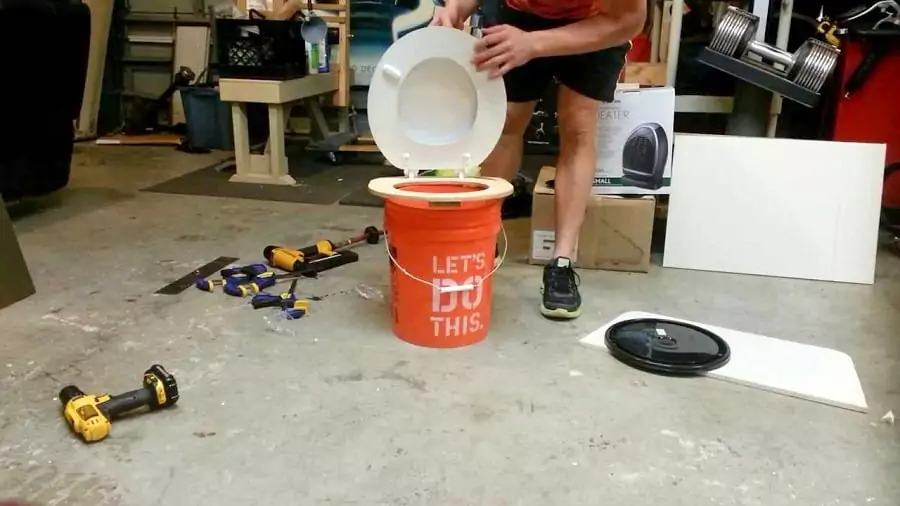
- Collect the materials you will need to build your camping toilet.
- Modify your store bought toilet by removing all of the lid bumpers, screws, and
- In this step, you will trace the top of the 5-gallon bucket onto the plywood. The bucket should be turned upside down and placed on top of the plywood. Trace the bucket outline onto the plywood, leaving enough room on the plywood to be able to cover the toilet seat.
Drill a hole inside the pattern circle and make sure it is enough to allow a scroll saw blade to fit through. - Now it’s time to trace the toilet seat onto the plywood. Start by cutting out the circle you traced from the bucket with a scroll saw. Place the plywood under the toilet seat. Center the hole in the toilet seat with the hole in the plywood, then trace the toilet seat onto the plywood.
- Cut the plywood into the correct shape by carefully cutting the outside of the pattern you just traced using a scroll saw.
- This step teaches you how to fasten your toilet together. Apply a layer of glue to the plywood and place it on the bottom of the toilet seat.
Make sure the plywood is lined up with the toilet seat and fasten it. Use any fastener you want but make sure it doesn’t go all the way through the toilet seat. - Sand, caulk, and paint your new camping toilet to make it look nice.
Additional Tips for Making Your Camping Toilet an Enjoyable Experience
A portable camping toilet comes in handy when you want a comfortable and easy to use the toilet for going to the bathroom outdoors. Make your experience more enjoyable by making cleanup easy and controlling the odor.
When you set up your toilet at a new campsite, fill it with a trash bag to make bucket cleanup easier. Keep extra trash bags in the bottom of the bucket so you never run out.
Never bury plastic, simply tie the trash bag and leave it in the bucket with the lid on until you can dispose of it in a trash receptacle. You can also help control the odor in your camping toilet by using sawdust to absorb any unwanted odors.
Place sawdust in the bottom of the trash bag when you set up your toilet and keep a container of sawdust next to the toilet to sprinkle it over after every time you use the toilet.
Most importantly, don’t forget to bring toilet paper! You can easily store it inside your 5-gallon bucket when you are transporting the toilet, but what about when your toilet is already set up?
There are several DIY ideas you can use for making toilet paper dispensers to leave next to the toilet. By making clean up easy and eliminating odor from the start, it will make your camping toilet more durable, easier to use, and a lot more comfortable.
Here are two toilet paper dispenser ideas we like best:
- Soda Bottle Toilet Paper Dispenser: Find a 2-liter soda bottle and measure 230mm from the top then cut off the bottom of the bottle. Next, measure 60mm from the bottom and cut off the top of the bottom piece.
Recycle the middle piece and place the two ends together to form a shorter soda bottle. Now pull the cardboard piece out of the center of a roll of toilet paper and pull out some of the toilet paper from the inside.
Feed the toilet paper through the top of the soda bottle then attach the two pieces of the bottle together with the toilet paper roll inside and you’ll have an easy-to-use toilet paper dispenser. - Baby Wipes Box Toilet Paper Dispenser: Simply place a toilet paper roll inside an empty baby wipes box. Feed the end of the toilet paper through the hole in the top of the box and put the lid back on to create a toilet paper dispenser.
Make sure your toilet paper is eco-friendly. Check out our article on where to find the best biodegradable toilet paper to take on your next camping trip.
Key Takeaways for Building Your DIY Camping Toilet
Bringing a toilet along on a camping trip makes the whole experience a lot more comfortable. Camping is always fun until nature calls and you have nowhere to do your business. Solve all of your outdoor bathroom problems by creating your own camping toilet to take with you from now on. For women, there are female urination devices available – check the previous article on a review on these hygienic devices to find out more.
You can build a comfortable toilet using a real toilet seat fastened over a bucket and use a few easy tips to make cleanup easy and eliminate any unwanted smells. Portable camping toilets are also environmentally friendly allowing you to dispose of your waste properly instead of polluting the environment you love to spend time in.
Our guidelines and tips on how to make a camping bathroom is a must-read that can help you a lot, so check it out.
You can follow our instructions for making your own portable camping toilet for a durable and comfortable option for doing your business outside. If you used our DIY camping toilet instructions, don’t forget to tell us about your experience!


I really wish I had read this article earlier. It would have made my camping trips a lot more enjoyable. However, it is never too late and I will put it to use on my next trip which is coming up in two months. Using these tips and everyday items, I will be able to answer the call of nature with a lot more comfort.
Answering the call of nature is one of the major challenges when backpacking. This was especially challenging for my girlfriend who I introduced to this lifestyle three years ago. She has slowly accepted the lifestyle and even loves it but this particular part remains a challenge.
It’s never to late Frank! lol. Thanks for dropping by and I’m glad you found the article useful. There’s a lot more to learn here, so take your time and enjoy reading more articles. These will really help a lot and will come in handy! 🙂
Great DIY tips and easy to follow too. Our teenage daughter really loves camping but she never quits grumbling about the lack of a toilet. I am sure this will make a difference in her camping experience and to be honest it will make a difference in mine too, so thank you very much for sharing.
I know how she feels, and so do most buddies I know! I think having a portable toilet makes camping life easier and fun. There are portable toilets you can buy but if you decide not to go on that route, the DIY option is available for you. 🙂
For women, it is. Although we have a lot of portable toilets especially made for camping that you can take a look at. Another option is to make your own, which the article focused on. Thanks for dropping by with your comments Peter!