

Have you ever found yourself in the unpleasant situation of having to go through the whole day with wet feet? The truth is that even a couple of minutes of this could be particularly unpleasant, let alone a few hours. This is most certainly a recipe for a guaranteed ruined day. Unfortunately enough, we would all have to deal with water as well as moisture when we’re out camping in the woods. Damp soil, rain or traversing rivers or other bodies of water will do that. This is why if you know how to waterproof boots, you’d be definitely better off.
Perhaps you might want to take a look at some of the waterproof boots available in quite a lot of stores. Of course, this is going to cost you to invest a certain amount for specialized foot wear which could be quite considerable, especially if you are going for a branded model.

You may not have such a great need for professional waterproof boots if they can’t fit in your budget. However, there are plenty of other options for you to consider. Below, you will find out the most common ways to get your boots waterproofed. We’ve made sure that we’ve encompassed everything that you need to know in a summarized yet detailed manner. So, without any further ado, let’s go ahead and take a look.
Waterproofing Extends The Life of Your Boots
A good pair of boots that are suitable for hiking can be very expensive, and no one wants to shell out more money to replace them. What makes them so pricey is not only the material they’re made out of, but also the job they fulfill.
They’re designed to withstand a lot of punishment, so they’re built to be durable. However, if you don’t take care of them properly, they will start to give out on you. So not only are you waterproofing your boots to promote comfort, but you’re also extending the life of your boots.

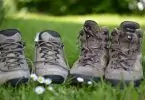
Image Credit: littlethings.com
Water and natural salt are known to cause major damage to boots over time, especially if you don’t clean them right away. If your boots are made from leather, they will start to dry out and crack, and that can make your boots look very unsightly. If you want to know more on how to repair your leather hiking boots, see our article on this topic.
Over time, these cracks will get larger, and the integrity of your boots will start to suffer. By waterproofing your boots, you’ll keep the leather soft and supple, and they’ll continue to do their job (as well as look good) for many years to come.
Methods of Waterproofing Your Boots
There are three particularly effective ways of getting your boots waterproofed. They include:
- Waxes, pastes and creams
- Waterproofing spray
- A special DIY method which is temporary but particularly effective
Of course, there might be other ways which are going to get your boots waterproofed. However, in our experience, we’ve found out that those are not only the only ones which are worth paying attention to but only the ones which are the most effective. So, let’s go ahead and take a closer look at each one of the methods.
Using waterproofing waxes, pastes and creams
While this is by far the most convenient, quickest and easiest way to get your boots thoroughly waterproofed, you would need to reapply the solutions every few weeks in order to get your feet dry.

It is hard to determine which particular product will work best so you might want to consult with the shop assistant or someone who’s done this before.
Using waxes, creams and paste:
- The first thing that you have to take care of is to get rid of all the mud and the dirt from your boots. This is particularly important. You can get a tube of cream for cleaning footwear in order to do this. You can also add water and dish washing liquid to clean them. Even though it may seem like a formality, this step is particularly important. By cleaning your shoes first, you are going to ensure that the designated solution works perfectly and is applied to as much of your boots’ surface as possible. Scrub the boots using a soft brush and ensure that you thoroughly rinse them after scrubbing.
- Now, when you are done cleaning, you should use a cloth or your hand and generously apply the solution (wax, cream or paste) to the shoe, ensuring that you do so using a circular motion. Make sure that you don’t forget the seams.
- Once you have applied the solution, get rid of the excess if there is some by using a clean cloth.
- Let your shoes dry for a night and you are good to go the next day.
Because this process requires some time, it’s a good idea to do this a few days before your planned camping trip so that you’re prepared for whatever elements may come your way.
Using waterproofing sprays
You should know that these are a good solution and a quick fix to resort to if you don’t feel like putting in a lot of effort. They are also a great time-saver. It’s as easy as it gets – you just need to spray your boots and you’re pretty much done with it.

Just as it is with the cream, you should make sure that you reapply the spray every couple of weeks in order to properly maintain the dryness of the shoe. You can use a spray which is based on silicone or oil if you have a sporting tight-grained leather boots, or an acrylic co-polymer if you have a nu-buck leather or suede boots.
How to use these sprays:
- The first thing that you need to do, once again, is to remove the mud as well as all other dirt from the boots. You can use any kind of footwear cleaning cream as well as water and soap.
- Once you are through with the first step, you are ready to spray them considerably. Hold the flacon 6 inches away from your boots. Start spraying and make sure that you apply at least a few thin coats. When you are through with that, apply one thick coat of the spray.
- Once you are done with the spraying it is important that you let the boots dry throughout the night.
Now, another thing that you need to take into account when using waterproofing sprays is that you should pay attention to the instructions.
Make sure to go through them thoroughly and see if the solution requires you to go over it a second time. If it does, you need to apply that second coat once the first one has dried.
The Desperate DIY solution
As promised, we are going to provide you with a desperate, yet particularly effective DIY solution which is going to help you considerably. If you are in a hurry and you have no time to apply spray or paste and yet you need to get your boots waterproofed, you can try to take advantage of the following quick-fixes.
Of course, keep in mind that these methods are usually fit for working boots and not for regular day-to-day shoes. However, you should also make sure that you give them a good scrub before you actually apply the legitimate waterproofing solution.

So, without any further ado, here is how to get your boots waterproof if you have no time to waste and you have no other handy materials.
- Use transmission oil. Sure, this might sound a bit odd and rather out of the box but it works. Transmission oil is going to effectively repel the water. Grab some of it and smear it throughout the entire exposed surface of the boots before you start working. Of course, you always run the risk of your boots turning red.
- Use Vaseline cream. This is another convenient solution if you desperately need to waterproof your boots. You need to rub it on the boots as if you are rubbing waterproofing cream. Of course, you shouldn’t expect the results to last for long but they should get you through the day at the very least.
- Use clear coat enamel spray. Once again, this is just a temporary solution and it’s likely to crack easily. However, if you have a can of this, you might as well take advantage of it if you’re already camping and don’t have your waterproofing tools with you. Having this on hand is better than not being prepared.
As you can see, there are quite a few different ways besides the conventional ones that you can take advantage of. All in all, learning how to waterproof your boots will spare you quite a lot of discomfort while you’re camping.
Reproofing
Now, as we mentioned above, these solutions are only good for a certain amount of time. With this in mind, reproofing your boots is something that should also be considered. The last thing that you want is to get used to the sweet sensation of having your feet perfectly protected and constantly dry, and then to start feeling the tremendously unsettling burden that is wet feet.
Regular cleaning and proper reproofing isn’t only going to ensure their ability to repel water, it’s also going to prolong the overall life span of the boots. To learn how to extend the life of your footwear, see our article on how to clean your hiking boots for more information.
Now, when it comes to reproofing, you need to account for a few different factors. The first one to consider is how often you actually wear the boots. You may not have to reproof them every single time you plan to go out.

However, making sure that this is a regular process is going to ensure that your toes remain as dry as possible. What is more, the way in which you reproof your boots is also determined by the material of their construction. So, with this in mind, let’s take a look at the different materials and how to reproof them.
- Boots made out of full grain leather. Of course, you have to clean the boots in order to have a proper result. After that you need to apply a small quantity of dubbing wax to a clean piece of cloth and start rubbing it over the leather. Repeat as much as it’s necessary and let it dry for about an hour. Make sure that you do not apply direct heat in order to prevent the boots leather from cracking.
- Suede and Nu-Buck leather boots.Clean those up properly as this is necessary to apply the reproofing solution. Choose the solution once you are through with the cleaning. You can choose between waxes, pastes, creams and sprays. If you use a spray, make sure that you apply it evenly throughout the area of the entire boot. Make sure that you leave it to dry after that and don’t go ahead and apply direct heat to prevent inflicting damage to the boot.
- Fabric boots. These can actually be rather hard to clean but you need to put in the effort in order to have the boots properly cleaned and to prolong their life span. Begin by cleaning the boots, as always, and choose an aerosol re-proofer or a spray. Some people would usually prefer spray as it’s a bit more concentrated. Unlike leather and suede boots, fabrics ones can actually be re-proofed while they are dry or wet, so that’s one thing that you don’t have to worry about.
As you can see, there are quite a lot of things that you might want to take into consideration if you want to learn how to waterproof boots. This is capable of helping you a lot in the endeavor and it makes your boots comfy and dry throughout your entire workday. See our guidelines on how to choose the best backpacking boots for your next adventure, it’s a must-read!
So, instead of investing a significant amount of money for waterproof boots, you can take advantage of the aforementioned methods and get it done yourself. This is going to spend you both money and inconvenience. You don’t have to suffer through the nightmare that is having wet feet ever again!
For more of our top list of the best hiking boots, see our previous article on this topic.


I really needed this article with its myriad of choices. My favorite hiking trails are located in very wet regions and me and wet feet don’t agree.
The reproofing portion of the article is helpful because my favorite boots are my oldest pair, and I need to put these suggestions to use ASAP.
One point I have is that a good pair of non-waterproof boots isn’t a bad idea to bring along if you’re hiking in a very dry climate. Waterproof boots don’t seem to breathe and my feet sweat, whereas the non-waterproof ones allow my feet to breathe and therefore stay more dry and comfortable in the heat.
I don’t know of anyone who would love the sensation of wet feet, especially when they’re tired from a long hike. We all have our own favorite trusty boots and I understand what you’re getting at. So, learning to waterproof a pair of boots is a must. I’m glad you were able to use the tips you’ve read here.
You can also use a mix of mix mineral oil and bees wax to waterproof your boots. I found this to waterproof boots better than sprays. Use a ratio of 10:1 mineral oil and bees wax. Gently heat the mixture in a double boiler until they can be mixed together. [Be careful in not applying strong heat because these products are flammable.] Let the mixture cool down. Clean and warm your boots first before applying this mixture. You can warm your boots by using a blow dryer, putting them out in the afternoon sun during summer, or putting them in front of a heater during winter. Apply this mixture on your boots with a toothbrush. This mixture can protect your boots better!
Thanks for this very useful advice! I love how my readers take the time out to share what they learn with other outdoor enthusiasts! I will try your mixture myself and see how these will protect my boots even better. Again, many thanks Gary.